

Latest Update: October 3, 2026 – Categories: The Witcher 3, Witcher 3 Best Builds
Discover the Ultimate Combat Build for The Witcher 3: Wild Hunt Remastered! In this guide we review the pros and cons, best weapons, armor, skills, spells and how to play this powerful Witcher 3 build.

More Witcher 3 Remastered
- The Witcher 3 Remastered Changes
- Official Patch Notes Explained
- The Witcher 3 Remastered Best Builds
- Witcher 3 Remastered NEW Skill Trees
- The Witcher 3 Signs & Upgrades
The Witcher 3 Combat Build Overview
This Combat build for The Witcher 3 Remastered focuses on fast attacks, critical strikes, and Adrenaline points to turn Geralt into an aggressive front line fighter who wins fights through pressure rather than preparation. Fast attacks and dodges feed into each other constantly, Adrenaline points boost your damage the longer a fight goes on, and strong attacks become huge finishers once you’re deep enough into the tree. The Combat tree in Remastered opens with a choice between Muscle Memory and Arrow Deflection, which helps shape whether your early build leans into melee pressure or ranged defense before the tree branches out further.
Combat Build Pros and Cons
Pros
The Combat build rewards aggressive, front line play from the moment you pick it up, with none of the setup time an Alchemy build requires or the positioning and upgrades of a Signs build. The Combat build scales with how actively you’re fighting, since skills like Muscle Memory and Razor Focus directly reward dodging, landing hits, and staying in combat rather than playing cautiously from range.
Cons
The downside of the Combat build is less crowd control options and less margin for error against tougher enemies, since you’re committing to melee range more consistently than a Signs build would. Several of this build’s best late-game skills, like Rend and Flood of Anger, also require decent Stamina and Adrenaline management, which takes some getting used to if you’re coming from a more passive playstyle.

Combat Build Leveling Guide
Ability Slots in The Witcher 3: Wild Hunt Remastered are unlocked by acquiring more Ability Points (at 0, 2, 4, 6, 8, 10, 12, 15, 18, 22, 26, and 30 total points). Most builds have 12 Ability Slots and 4 Mutagen Slots, though more can be unlocked through DLC content. Since you have more abilities than slots, some skills will only be used to pass through to the next node, whole others will be added to your unlocked slots. The following leveling guide explains which abilities to Slot, Upgrade, or Pass through and when to take them in order of priority.
| Ability Points | Slot | Skill | Use |
| 0 | 1 | Refreshment 1 | Slot |
| 1 | Refreshment 2 | Upgrade | |
| 2 | 2 | Cat School Techniques 1 | Slot |
| 3 | Battle Frenzy 1 | Pass | |
| 4 | 3 | Strong Back 1 | Slot |
| 5 | Refreshment 3 | Upgrade | |
| 6 | 4 | Gourmand 1 | Slot |
| 7 | Gourmand 2 | Upgrade | |
| 8 | 5 | Muscle Memory 1 | Slot |
| 9 | Gourmand 3 | Upgrade | |
| 10 | 6 | Sustained Glyphs 1 | Slot |
| 11 | Three Strikes 1 | Pass | |
| 12 | 7 | Undying 1 | Slot |
| 13 | Muscle Memory 2 | Upgrade | |
| 14 | Muscle Memory 3 | Upgrade | |
| 15 | 8 | Fleet-Footed 1 | Slot |
| 16 | Fleet-Footed 2 | Upgrade | |
| 17 | Fleet-Footed 3 | Upgrade | |
| 18 | 9 | Whirl 1 | Slot |
| 19 | Whirl 2 | Upgrade | |
| 20 | Whirl 3 | Upgrade | |
| 21 | Sustained Glyphs 2 | Upgrade | |
| 22 | 10 | Rend 1 | Slot |
| 23 | Rend 2 | Upgrade | |
| 24 | Rend 3 | Upgrade | |
| 25 | Sustained Glyphs 3 | Upgrade | |
| 26 | 11 | Crippling Strike 1 | Slot |
| 27 | Crippling Strike 2 | Upgrade | |
| 28 | Crippling Strike 3 | Upgrade | |
| 29 | Hunter Instinct 1 | Pass | |
| 30 | 12 | Acquired Tolerance 1 | Slot |
| 31 | Acquired Tolerance 2 | Upgrade | |
| 32 | Acquired Tolerance 3 | Upgrade | |
| 33 | Cat School Techniques 2 | Upgrade | |
| 34 | Cat School Techniques 3 | Upgrade | |
| 35 | Undying 2 | Upgrade |
Combat Build Best Skills Explained
The Combat tree opens with a choice between Muscle Memory, which gives your next fast attack 30% additional damage after a successful dodge or roll, and Arrow Deflection, which lets you parry ranged arrow attacks and send them back at the enemy with a well timed block. Muscle Memory is the stronger opener for most Combat builds, since it rewards the dodge-and-strike rhythm this build is focused on, while Arrow Deflection can essentially be replaced with better positioning, dodges, or even using Quen. Several General Skills and Alchemy Skills are also useful for the Combat Build.
- Refreshment (Alchemy) – pick this early for a free heal, up to 30% of your total Vitality, any time you use a potion, even an offensive boost like Thunderbolt.
- Muscle Memory (Combat) – after a successful dodge or roll, your next fast attack deals 30% additional damage, forming the core early playstyle. Upgrades to the next 3 attacks at rank 3.
- Cat School Techniques (General) – this fits our preferred Armor Type being Light Armor for bonus Critical Damage and Fast Attack Damage.
- Strong Back (General) – pick this up early to help with carrying more items around and selling. Can be dropped later as you level up and carry weight increases.
- Gourmand (General) – an essential healing and utility skill, this makes all your food buffs last a full 15 minutes in Remastered, ensuring you are always healing in and out of combat.
- Sustained Glyphs (Signs) – the only Signs skill worth investing into for a Combat build as this extends your Signs duration by 15 seconds at rank 3 and also adds extra traps to Yrden.
- Three Strikes (Combat) – generally best to pass through this ability as it can be hard to successfully get 3 fast attacks in a row versus tougher opponents.
- Undying (Combat) – when your health depletes, converts Adrenaline to restore 10% Vitality per point on a 30 second cooldown, giving you a free safety net in tougher fights.
- Fleet-Footed (Combat) – an amazing defense skill pickup that reduces your damage by 100% at rank 3 while dodging. We get this benefit constantly as we want to be dodging on this build to use Muscle Memory.
- Whirl (Combat) – a spinning attack that hits every nearby enemy, maintained by spending Stamina and Adrenaline, essential for clearing groups in the mid to late game, rather than fighting one target at a time.
- Rend (Combat) – a strong attack whose damage scales with Stamina consumed and ignores enemy defenses, with each Adrenaline point boosting its total damage by 10%, making it the build’s best single-target finisher.
- Acquired Tolerance (Alchemy) – increases your max Toxicity based on how many Alchemy recipes you have learned, making it easier to use potions and decoctions.
Beyond these ten, the tree continues into Cold Blood, Fleet-Footed, Lightning Reflexes, Anatomical Knowledge, Counterattack, Crippling Strike, Maiming Shot, Deadly Precision, and Flood of Anger as you follow the path further. Flood of Anger in particular is worth building toward for a hybrid Combat and Signs playthrough, since spending 3 Adrenaline casts your next Sign at maximum level and boosts Sign intensity by 50%. Remember that every skill can be upgraded to Rank 3, and use the recommended leveling guide above to plan your progression.
Combat Build Armor
The top armor picks for the Witcher 3 Combat Build include the Feline (Cat) and Ursine school sets:
- Cat (Feline) Armor – the standard pick for this build, since its set bonuses boost fast attack damage and reward the dodge-heavy, aggressive playstyle this tree is built around.
- Ursine Armor (defensive pick) – worth considering if you’re leaning into strong attacks and Rend specifically, since its bonuses favor a heavier, more deliberate attack pattern over constant fast attacks.
- A lighter mixed loadout – some players mix in a Wolf School piece or two for balanced stats if they’re not fully committed to the Cat School Techniques skill in the General tree.
Combat Build Weapons
- Feline Steel and Silver Swords – the best early picks which increases your set bonuses with Feline gear.
- Steel sword enchanted for critical hit chance – essential, since this entire build’s damage scales off how often and how hard your crits land, especially once you’ve invested in the fast attack skills early in the tree.
- Silver sword built the same way – keeps your damage consistent against monsters instead of forcing you to switch playstyles depending on the enemy type.
- A sword with a Stamina-focused rune – since Whirl and Rend both consume Stamina to function, a rune that improves Stamina regeneration or reduces consumption noticeably smooths out your late-game rotation.
Combat Build Equipment Loadout
| Item Name | Stats | Required Ingredients |
|---|---|---|
 Feline Steel Sword | 162 – 198 Damage, +5% Chance for bleeding, +5% Bonus XP from Humans | 1x Leather Straps, 4x Iron Ingot, 1x Monster Saliva, 1x Ruby Dust Required Level 17 |
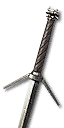 Feline Silver Sword | 256 – 312 Damage, +12% Aard Sign Intensity, +5% Chance for bleeding, +20% Bonus XP from Monsters | 1x Monster Eye, 2x Silver Ingot, 2x Leather Straps, 1x Ruby Dust Required Level 17 |
 Feline Armor | 120 Armor, +5% Attack Power, +5% Piercing Defense, +5% Slashing Defense, +5% Monster Defense, +20% Elemental Defense | 1x Shirt, 2x Hardened Leather, 2x Dark Steel plate, 2x Hardened Timber, 1x Powdered Monster Tissue Required Level 17 |
 Feline Boots | 43 Armor, +5% Attack Power, +1% Piercing Defense, +2% Slashing Defense, +2% Monster Defense, +5% Elemental Defense | 2x Hardened Leather, 1x Dark Iron Ore, 2x Monster Eye, 2x Leather Straps, 1x Hardened Timber Required Level 17 |
 Feline Gauntlets | 39 Armor, +5% Attack Power, +1% Piercing Defense, +1% Slashing Defense, +1% Monster Defense, +5% Elemental Defense | 2x Cured Leather, 1x Dark Iron Ore, 2x Monster Tooth, 2x Nails, 1x Hardened Timber Required Level 17 |
 Feline Trousers | 43 Armor, +5% Attack Power, +1% Piercing Defense, +3% Slashing Defense, +3% Monster Defense, +7% Elemental Defense | 4x Leather Scraps, 1x Cured Leather, 2x Silk, 1x Hardened Timber, 1x Monster Brain Required Level 17 |
Best Potions and Consumables
Combat builds lean less on alchemy than a dedicated Alchemy build, but a few consumables are worth keeping stocked regardless. Swallow is your best in slot early heal – grab this as soon as possible for emergency heals. Thunderbolt is the standout potion here, boosting your attack power directly during a fight. Tawny Owl helps keep your Stamina pool topped off for Whirl and Rend, both of which drain it quickly once you’re using them regularly. Necrophage Oil and Specter Oil remain worth carrying in the early game even on a Combat build, since applying an oil costs nothing and adds free damage on top of whatever your sword is already doing.

Pro Tip: Decoctions unlock later through the main questline and Blood and Wine, and they’re worth prioritizing once available, since Tissue Transmution turns every decoction into a temporary 300 point Vitality buffer on top of whatever the decoction itself does.
Best Mutagens
Red mutagens are the natural fit for a Combat build, since they slot into skills tied to Combat specifically and boost your attack damage. A 10% Attack Power Greater Red Mutagen will get boosted to 40% Attack Power if slotted with 3 red skills, and you can do this at least twice with the leveling progression above.
Mixing in a Greater Green Mutagen with 3 Alchemy skills can also be quite strong as this would get boosted to +600 Vitality in total. The recommended Alchemy skills for this would be Refreshment, Acquired Tolerance and Tissue Transmutation.
Once the Mutations tree is available through Blood and Wine, Mutated Skin is worth considering for a tankier Combat build, since it reduces incoming damage for every Adrenaline point you’re holding, directly rewarding this build’s natural tendency to generate Adrenaline through aggressive play. For greater offensive potential in most encounters, pick Deadly Counter instead which increases Sword attack damage.

How to Play The Combat Build
The core rhythm of this build is dodge, strike, and keep moving. Muscle Memory means your fast attacks hit hardest right after a successful dodge or roll, so stay mobile and plan to dodge a lot to gain that bonus. Your currently equipped sword should light up slightly blue in color when this bonus triggers so look for this before striking.
Once you have Whirl and Rend unlocked, use Whirl against groups of weaker enemies to clear them out efficiently, and save Rend for the single tough target in a fight where you need damage fast. Keep an eye on your Adrenaline throughout a fight rather than letting it sit unused, since Undying, and Rend all scale off how much you’re holding. If a fight turns against you, Undying’s Vitality conversion is there as a panic button, but it’s on a 30 second cooldown, so don’t rely on it as your primary sustain plan the way an Alchemy build would lean on potions.
Progression Guide by Region
White Orchard (Levels 1-4)
Spend your first skill point on Muscle Memory so you can lean into the dodge-and-strike rhythm from the start. Pick up the Viper sword diagrams the same way any build should, crafting both at the Nilfgaardian garrison’s quartermaster, and clear every Place of Power in the zone for free skill points. Upgrade into the Warrior’s Leather Jacket through the dwarven armor side quest and grab the Temerian armor set for level four, since its light armor bonuses pair well with an early Cat School Techniques pick in the General tree.
Vizima and Early Velen (Levels 4-7)
Grab the free relic gear chest in Vizima Castle if you’ve linked a GOG account, since the Thousand Flowers armor and swords carry a Combat build just as well as any other through this stretch. Continue down the Combat tree into Strength Training and Three Strikes, since both reward the fast attack habits you should already be building with the Viper swords.
Velen and Novigrad (Levels 7-11)
The Thousand Flowers set remains solid here, and it’s worth pairing with a sword carrying a critical hit chance enchantment as soon as you can afford one. This is a good window to pick up Resolve and start working toward Undying, since Velen and Novigrad both throw tougher, more punishing single enemies at you than White Orchard did.
Velen, Novigrad, and Skellige (Levels 11-17)
Transition into Feline Armor once you hit level 17 and have the crafting materials to put a full set together. This is also the stretch where Whirl and Rend become available further down the tree, and both are worth prioritizing right away, since they form the backbone of this build’s late game damage against both groups and single tough targets.
Skellige and Blood and Wine (Levels 17 and Beyond)
Once the Mutations tree unlocks, Mutated Skin is worth strong consideration if you want more survivability to match this build’s aggression. Continue upgrading Rend and Sunder Armor as your primary damage loop, and consider investing into Flood of Anger if you want to blend in some Sign usage for burst damage against particularly tough late-game enemies in Toussaint.

The Final Word
A Combat build rewards constant motion and aggression more than any other playstyle in Witcher 3 Remastered, and the new tree’s branching structure makes the choice between Muscle Memory and Arrow Deflection feel like a real decision right from level one. Commit to the dodge-and-strike rhythm early, prioritize Whirl and Rend the moment they’re available, and don’t sleep on Undying as your late-game safety net. Check out our updated skill trees guide for how the Combat tree connects to the other three, and our full builds guide to see how this stacks up against Alchemy, Signs, and the rest of Remastered’s build options.
The Witcher 3 Combat Build FAQ
1. Should I pick Muscle Memory or Arrow Deflection first?
Muscle Memory is the stronger opener for most Combat builds since it rewards the dodge-and-strike rhythm the entire tree is built around, while Arrow Deflection is worth taking first if you expect heavy ranged enemy encounters early.
2. What’s the best armor for a dedicated Combat build?
Grandmaster Cat Armor is the standard pick, since its set bonuses boost fast attack damage and reward this build’s aggressive, dodge-heavy playstyle.
3. Is Rend worth prioritizing over Whirl?
Both matter, but Rend is your best single-target finisher since its damage scales with Stamina spent and ignores enemy defenses, while Whirl is the better pick for clearing groups of weaker enemies efficiently.
4. Does a Combat build need to invest in Signs at all?
No, but Flood of Anger is worth considering later in the tree if you want occasional burst Sign damage, since spending 3 Adrenaline casts your next Sign at maximum level.
5. What color mutagen works best with this build?
Red mutagens are the standard choice since they boost Combat skills directly, though mixing in blue or green mutagens is fine for a hybrid build leaning on Signs or Alchemy as a secondary focus.


